Staining a headshell
Moderators: greatmutah, GuitarBilly
-
clipless bumper
- clipless
- Posts: 20317
- Joined: Sat Jan 19, 2013 10:06 am
- Location: 20 miles outside of Philly
Re: Staining a headshell
Don't you want to go finer AFTER staining for a final finish?

Re: Staining a headshell
EndTime wrote:Holy-diver wrote:what grits should i buy, im planning on using an oil based stain and i was thinking down to like 200, but whats a good progression?
Depending on how much sanding is necessary. If yo ucan start at 120, then start there. Do 120, 180 and maybe 220 if you want.. But 180, or even 150 should be fine as a final grit if it was sanded by hand.. Any smoother than 220 and you are essentially polishing the wood which is closing the grain more and more and prevents stain from penetrating and absorbing evenly.. Especially maple.. For guitars I generally sand maple to 220 and it works well.. But again, thats using dyes.. For typical Minwax oil stains, its not necessary to sand it glass smooth before you stain.. Like I mentioned its closing the grain and for a wood like maple to take stain evenly(which it really doesnt) you ideally want the grain to be open.. Which is either sanding up to 150, or "popping the grain" if you wanted to go real dark like Ebony..
Ok so let me make sure I am understanding what I think the basic process would be.
1. Use spray bottle with water to wet the wood
2. When dry, sand with 120
3. Spray with water again
4. Sand with maybe 150?
5. Apply dye as desired, wiping excess off and let dry
is that about right? Is something like a spray shellac ok? Maybe 3 or 4 coats and then super fine hand sand?
_____________________________________________________
I have some gear and junk...
Like Coffee? Like Pedals and amps? Like General Jackassery???
Check out "Dunky's N' Demos at:
https://dunkysndemos.com
https://www.youtube.com/c/JeremyVarao
I have some gear and junk...
Like Coffee? Like Pedals and amps? Like General Jackassery???
Check out "Dunky's N' Demos at:
https://dunkysndemos.com
https://www.youtube.com/c/JeremyVarao

Re: Staining a headshell
YOu wouldnt sand the stain./ After its stain, you start the coating process. You would sand the finish between coats which you can go finer, but honestly anything beyond 220 is essentially overkill for a typical oil or waterbase finish you would find at Menards or Depot..mamberg wrote:Don't you want to go finer AFTER staining for a final finish?
For example for a lacquer finish on guitars I would sand with with 320 for finish leveling earliy in the process and generally final level sand at 400, or maybe 600grit before the final finish is sprayed. And it'll be a really smooth finish. Which also gets further sanded and buffed out after the finish cures... But lacquer melds into each successive coat.
Waterbase or oil base finished sold by Minwax (or whoever else) are not finishes that meld into each other.. they go layer upon layer.. And sanding the previous finish too smooth actually can cause adhesion problems since there isnt enough "bite" from the sanding to allow the next coat to get good adhesion. YOu want some sanding "grooves"in the previous finish for the next coat... Now, Ive personally never really experienced this by sanding too smooth between coats, but I never was taught to use anything beyond 220 for typical wood finishing and Ive never had a problem getting a glass smooth finish using 220 for final sanding before the final coat.. YOu can probably go up to 400 by hand with an oil orwater base polyurethane and be ok, but its not necessary or recommended. Anything like 800-1000 grit you may actually run into problems Id imagine.. 220 grit with a random orbital sander is also incredibly smooth and there is no need to go finer..
I should mention I almost always use random orbital sanders with 180 or 220 for buffing between coats.. Its like glass before we apply the final coat.. 220 by hand wont get quite as smooth, but its still smooth enough for most things.. Using finer paper by hand is will "feel" smooth, but likely you arent level sanding it as well as you think. Because sanding a finish by hand with 320 is just not enough cutting power. After the final coat you'll likely see low spots or the grain appears more noticeable becasue it wasnt level sanded as evenly as a random orbit with 220 will do.. BUt like anything using a machine sander has more power and its easier to sand thru the finish into the stain..
Last edited by EndTime on Tue Mar 15, 2016 2:44 pm, edited 1 time in total.
Slobber Rod wrote: I got my hand stuck in my ass
Like vinyl? Wanna spend some money? Maybe buy this! viewtopic.php?f=5&t=38142
Re: Staining a headshell
JerEvil wrote:EndTime wrote:Holy-diver wrote:what grits should i buy, im planning on using an oil based stain and i was thinking down to like 200, but whats a good progression?
Depending on how much sanding is necessary. If yo ucan start at 120, then start there. Do 120, 180 and maybe 220 if you want.. But 180, or even 150 should be fine as a final grit if it was sanded by hand.. Any smoother than 220 and you are essentially polishing the wood which is closing the grain more and more and prevents stain from penetrating and absorbing evenly.. Especially maple.. For guitars I generally sand maple to 220 and it works well.. But again, thats using dyes.. For typical Minwax oil stains, its not necessary to sand it glass smooth before you stain.. Like I mentioned its closing the grain and for a wood like maple to take stain evenly(which it really doesnt) you ideally want the grain to be open.. Which is either sanding up to 150, or "popping the grain" if you wanted to go real dark like Ebony..
Ok so let me make sure I am understanding what I think the basic process would be.
1. Use spray bottle with water to wet the wood
2. When dry, sand with 120
3. Spray with water again
4. Sand with maybe 150?
5. Apply dye as desired, wiping excess off and let dry
is that about right? Is something like a spray shellac ok? Maybe 3 or 4 coats and then super fine hand sand?
If you are going to use a dye, then I would probably go to 220 and NOT pop the grain with water.. Dye is different than stain.. Stain is penetrating the wood, dye is more or less dyeing the wood.. So thats why I dont sand wood too fine when using stain..
For dye, 220 grit with an alcohol or water base dye is usually pretty good for me..
So just start sanding with 120 or 150(whatever is necessary) 180 then final with 220.. Then go ahead with your dye..
Shellac is a great sealer, but its not really a hard final coat. So I wouldnt recommend it for a headshell. YOu can use shellac under a water or oil-base finish tho.. But I think for the color you want I would use a waterbase spray poly.. Minwax has the Polycrylic stuff.. The reason why is, oil base finish yellows over time. Which over grey isnt all that great looking.. Shellac doesnt yellow over time, but it has a golden tone to it that over a black or grey finish will show a bit of yellow. Waterbases are clear.. Plus they are very hard. Quick drying and dont have much of an odor..
Slobber Rod wrote: I got my hand stuck in my ass
Like vinyl? Wanna spend some money? Maybe buy this! viewtopic.php?f=5&t=38142
Re: Staining a headshell
Also you arent final sanding the final coat. Unless you use something like lacquer that'll cure hard enough to use a compound and polish to a high gloss.. For any spray water or oil base, the final coat IS the final coat.. No sanding after that point.. You could probably buff out those finishes once they fully cure, but they dont fully cure for 30 or more days for an oil..
If smell isnt an issue, Minwax actually makes a decent spray-can Lacquer. Its the only Minwax product I'll actually use.. lol.. You'll get a bit of yellowing over the stain, but its a nice product and you can get it to be really smooth and professional..
If smell isnt an issue, Minwax actually makes a decent spray-can Lacquer. Its the only Minwax product I'll actually use.. lol.. You'll get a bit of yellowing over the stain, but its a nice product and you can get it to be really smooth and professional..
Slobber Rod wrote: I got my hand stuck in my ass
Like vinyl? Wanna spend some money? Maybe buy this! viewtopic.php?f=5&t=38142
Re: Staining a headshell
EndTime wrote:JerEvil wrote:EndTime wrote:Holy-diver wrote:what grits should i buy, im planning on using an oil based stain and i was thinking down to like 200, but whats a good progression?
Depending on how much sanding is necessary. If yo ucan start at 120, then start there. Do 120, 180 and maybe 220 if you want.. But 180, or even 150 should be fine as a final grit if it was sanded by hand.. Any smoother than 220 and you are essentially polishing the wood which is closing the grain more and more and prevents stain from penetrating and absorbing evenly.. Especially maple.. For guitars I generally sand maple to 220 and it works well.. But again, thats using dyes.. For typical Minwax oil stains, its not necessary to sand it glass smooth before you stain.. Like I mentioned its closing the grain and for a wood like maple to take stain evenly(which it really doesnt) you ideally want the grain to be open.. Which is either sanding up to 150, or "popping the grain" if you wanted to go real dark like Ebony..
Ok so let me make sure I am understanding what I think the basic process would be.
1. Use spray bottle with water to wet the wood
2. When dry, sand with 120
3. Spray with water again
4. Sand with maybe 150?
5. Apply dye as desired, wiping excess off and let dry
is that about right? Is something like a spray shellac ok? Maybe 3 or 4 coats and then super fine hand sand?
If you are going to use a dye, then I would probably go to 220 and NOT pop the grain with water.. Dye is different than stain.. Stain is penetrating the wood, dye is more or less dyeing the wood.. So thats why I dont sand wood too fine when using stain..
For dye, 220 grit with an alcohol or water base dye is usually pretty good for me..
So just start sanding with 120 or 150(whatever is necessary) 180 then final with 220.. Then go ahead with your dye..
Shellac is a great sealer, but its not really a hard final coat. So I wouldnt recommend it for a headshell. YOu can use shellac under a water or oil-base finish tho.. But I think for the color you want I would use a waterbase spray poly.. Minwax has the Polycrylic stuff.. The reason why is, oil base finish yellows over time. Which over grey isnt all that great looking.. Shellac doesnt yellow over time, but it has a golden tone to it that over a black or grey finish will show a bit of yellow. Waterbases are clear.. Plus they are very hard. Quick drying and dont have much of an odor..
Awesome man! Thanks.
So again, DO NOT pop the grain with water, just use my orbital sander with 150 then 180 then 220, then apply dye (I bought water based). Let it dry. Get some of the MinWax Polycrilic spray, do 3 or 4 coats and call it done?
Sorry for all the questions on this! No wonder my wife wants to punch me daily!
Also, is there any benefit to sanding back down to the wood after a coat or 2 of dye to make the soft grain darker? Does due not work that way?
Definitely going to grab some test boards this weekend
_____________________________________________________
I have some gear and junk...
Like Coffee? Like Pedals and amps? Like General Jackassery???
Check out "Dunky's N' Demos at:
https://dunkysndemos.com
https://www.youtube.com/c/JeremyVarao
I have some gear and junk...
Like Coffee? Like Pedals and amps? Like General Jackassery???
Check out "Dunky's N' Demos at:
https://dunkysndemos.com
https://www.youtube.com/c/JeremyVarao
Re: Staining a headshell
JerEvil wrote:EndTime wrote:JerEvil wrote:EndTime wrote:Holy-diver wrote:what grits should i buy, im planning on using an oil based stain and i was thinking down to like 200, but whats a good progression?
Depending on how much sanding is necessary. If yo ucan start at 120, then start there. Do 120, 180 and maybe 220 if you want.. But 180, or even 150 should be fine as a final grit if it was sanded by hand.. Any smoother than 220 and you are essentially polishing the wood which is closing the grain more and more and prevents stain from penetrating and absorbing evenly.. Especially maple.. For guitars I generally sand maple to 220 and it works well.. But again, thats using dyes.. For typical Minwax oil stains, its not necessary to sand it glass smooth before you stain.. Like I mentioned its closing the grain and for a wood like maple to take stain evenly(which it really doesnt) you ideally want the grain to be open.. Which is either sanding up to 150, or "popping the grain" if you wanted to go real dark like Ebony..
Ok so let me make sure I am understanding what I think the basic process would be.
1. Use spray bottle with water to wet the wood
2. When dry, sand with 120
3. Spray with water again
4. Sand with maybe 150?
5. Apply dye as desired, wiping excess off and let dry
is that about right? Is something like a spray shellac ok? Maybe 3 or 4 coats and then super fine hand sand?
If you are going to use a dye, then I would probably go to 220 and NOT pop the grain with water.. Dye is different than stain.. Stain is penetrating the wood, dye is more or less dyeing the wood.. So thats why I dont sand wood too fine when using stain..
For dye, 220 grit with an alcohol or water base dye is usually pretty good for me..
So just start sanding with 120 or 150(whatever is necessary) 180 then final with 220.. Then go ahead with your dye..
Shellac is a great sealer, but its not really a hard final coat. So I wouldnt recommend it for a headshell. YOu can use shellac under a water or oil-base finish tho.. But I think for the color you want I would use a waterbase spray poly.. Minwax has the Polycrylic stuff.. The reason why is, oil base finish yellows over time. Which over grey isnt all that great looking.. Shellac doesnt yellow over time, but it has a golden tone to it that over a black or grey finish will show a bit of yellow. Waterbases are clear.. Plus they are very hard. Quick drying and dont have much of an odor..
Awesome man! Thanks.
So again, DO NOT pop the grain with water, just use my orbital sander with 150 then 180 then 220, then apply dye (I bought water based). Let it dry. Get some of the MinWax Polycrilic spray, do 3 or 4 coats and call it done?
Sorry for all the questions on this! No wonder my wife wants to punch me daily!
No worries.. Ok, I'll tweak this a bit because you are using a water base dye..
So, to quickly explain first. Just like popping the grain with water raises the wood fibers and makes the wood "rough", so will using a a water base dye.. So as you are applying the dye you'll feel the wood getting rougher.. Which isnt all that big of deal, but you will need to work a little bit during the clear finishing process to get it nice and smooth. So one way to keep the water from the dye from raising the grain too much is TO pop the grain with water, then sand it smooth again. But you wouldnt pop the grain after you final sand.. Basically the more times you pop the grain with water and subsequent sand smooth, the next time water hits the wood there wont be as much grain raise.. SO after you are done dyeing the wood, it'll still have some roughness but not as much..
So a quick step by step.
Sand 120 to 150 with your sander..
-Wet the wood. Let dry
-Resand again. You may have to start at 120 again to knock down all the fibers.. YOu be the judge. But final sand up to 220, even tho I think 180 is ok too with an orbital sander
-Apply dye. You wont do anything to the dye unless you want to do stuff like sand it back and get some different looks.. But if you are happy with how the dye turned out, then move on to
-Spraying first coat of the Polycrylic
-After that first coat, lightly, I mean like feather light sand it with 220 by hand.. You arent doing anything but knocking down any debris at this point..
-Spray 2nd coat
-Repeat with a light sanding by hand with 220
-Spray 3rd coat
-At this point you *should* have enough build up to get a little more aggressive with sanding.. 220 grit with a random orbital sander will definitely leave it smooth as silk, but if you have sprayed really light coats it'll also be easy to sand thru the finish.. You are gonna have to feel that out for yourself. (You may want to put down 3-4 coats with light sanding by hand before you hit it with your sander just to be sure you have enough build up to withstand the palm sander.. Its ok it the coats arent glass smooth after 3-4 coats.. The only time you need it glass is the final coat..)
-Go ahead and spray final coat. If it went well, then you are done..
If its not quite enough build up then keep repeating until you get the look you want.. If you are spraying light coats 5-6 coats of polycrylic wouldnt be that uncommon.
I should also mention you want to clean off the headshell between sanding finish coats with a vacuum/tack cloth..
Slobber Rod wrote: I got my hand stuck in my ass
Like vinyl? Wanna spend some money? Maybe buy this! viewtopic.php?f=5&t=38142
Re: Staining a headshell
EndTime wrote:JerEvil wrote:EndTime wrote:JerEvil wrote:EndTime wrote:Holy-diver wrote:what grits should i buy, im planning on using an oil based stain and i was thinking down to like 200, but whats a good progression?
Depending on how much sanding is necessary. If yo ucan start at 120, then start there. Do 120, 180 and maybe 220 if you want.. But 180, or even 150 should be fine as a final grit if it was sanded by hand.. Any smoother than 220 and you are essentially polishing the wood which is closing the grain more and more and prevents stain from penetrating and absorbing evenly.. Especially maple.. For guitars I generally sand maple to 220 and it works well.. But again, thats using dyes.. For typical Minwax oil stains, its not necessary to sand it glass smooth before you stain.. Like I mentioned its closing the grain and for a wood like maple to take stain evenly(which it really doesnt) you ideally want the grain to be open.. Which is either sanding up to 150, or "popping the grain" if you wanted to go real dark like Ebony..
Ok so let me make sure I am understanding what I think the basic process would be.
1. Use spray bottle with water to wet the wood
2. When dry, sand with 120
3. Spray with water again
4. Sand with maybe 150?
5. Apply dye as desired, wiping excess off and let dry
is that about right? Is something like a spray shellac ok? Maybe 3 or 4 coats and then super fine hand sand?
If you are going to use a dye, then I would probably go to 220 and NOT pop the grain with water.. Dye is different than stain.. Stain is penetrating the wood, dye is more or less dyeing the wood.. So thats why I dont sand wood too fine when using stain..
For dye, 220 grit with an alcohol or water base dye is usually pretty good for me..
So just start sanding with 120 or 150(whatever is necessary) 180 then final with 220.. Then go ahead with your dye..
Shellac is a great sealer, but its not really a hard final coat. So I wouldnt recommend it for a headshell. YOu can use shellac under a water or oil-base finish tho.. But I think for the color you want I would use a waterbase spray poly.. Minwax has the Polycrylic stuff.. The reason why is, oil base finish yellows over time. Which over grey isnt all that great looking.. Shellac doesnt yellow over time, but it has a golden tone to it that over a black or grey finish will show a bit of yellow. Waterbases are clear.. Plus they are very hard. Quick drying and dont have much of an odor..
Awesome man! Thanks.
So again, DO NOT pop the grain with water, just use my orbital sander with 150 then 180 then 220, then apply dye (I bought water based). Let it dry. Get some of the MinWax Polycrilic spray, do 3 or 4 coats and call it done?
Sorry for all the questions on this! No wonder my wife wants to punch me daily!
No worries.. Ok, I'll tweak this a bit because you are using a water base dye..
So, to quickly explain first. Just like popping the grain with water raises the wood fibers and makes the wood "rough", so will using a a water base dye.. So as you are applying the dye you'll feel the wood getting rougher.. Which isnt all that big of deal, but you will need to work a little bit during the clear finishing process to get it nice and smooth. So one way to keep the water from the dye from raising the grain too much is TO pop the grain with water, then sand it smooth again. But you wouldnt pop the grain after you final sand.. Basically the more times you pop the grain with water and subsequent sand smooth, the next time water hits the wood there wont be as much grain raise.. SO after you are done dyeing the wood, it'll still have some roughness but not as much..
So a quick step by step.
Sand 120 to 150 with your sander..
-Wet the wood. Let dry
-Resand again. You may have to start at 120 again to knock down all the fibers.. YOu be the judge. But final sand up to 220, even tho I think 180 is ok too with an orbital sander
-Apply dye. You wont do anything to the dye unless you want to do stuff like sand it back and get some different looks.. But if you are happy with how the dye turned out, then move on to
-Spraying first coat of the Polycrylic
-After that first coat, lightly, I mean like feather light sand it with 220 by hand.. You arent doing anything but knocking down any debris at this point..
-Spray 2nd coat
-Repeat with a light sanding by hand with 220
-Spray 3rd coat
-At this point you *should* have enough build up to get a little more aggressive with sanding.. 220 grit with a random orbital sander will definitely leave it smooth as silk, but if you have sprayed really light coats it'll also be easy to sand thru the finish.. You are gonna have to feel that out for yourself. (You may want to put down 3-4 coats with light sanding by hand before you hit it with your sander just to be sure you have enough build up to withstand the palm sander.. Its ok it the coats arent glass smooth after 3-4 coats.. The only time you need it glass is the final coat..)
-Go ahead and spray final coat. If it went well, then you are done..
If its not quite enough build up then keep repeating until you get the look you want.. If you are spraying light coats 5-6 coats of polycrylic wouldnt be that uncommon.
I should also mention you want to clean off the headshell between sanding finish coats with a vacuum/tack cloth..
You are a beautiful man and one day they will sing songs of your greatness!
_____________________________________________________
I have some gear and junk...
Like Coffee? Like Pedals and amps? Like General Jackassery???
Check out "Dunky's N' Demos at:
https://dunkysndemos.com
https://www.youtube.com/c/JeremyVarao
I have some gear and junk...
Like Coffee? Like Pedals and amps? Like General Jackassery???
Check out "Dunky's N' Demos at:
https://dunkysndemos.com
https://www.youtube.com/c/JeremyVarao
Re: Staining a headshell
haha, no problem and good luck!
Slobber Rod wrote: I got my hand stuck in my ass
Like vinyl? Wanna spend some money? Maybe buy this! viewtopic.php?f=5&t=38142

Re: Staining a headshell
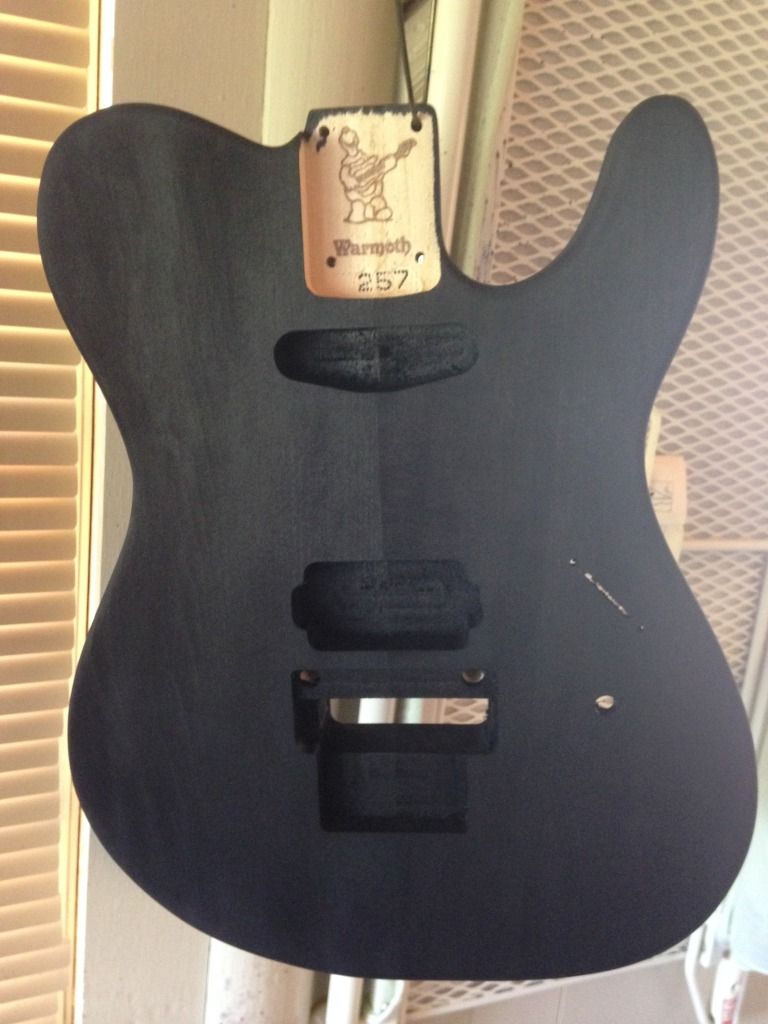
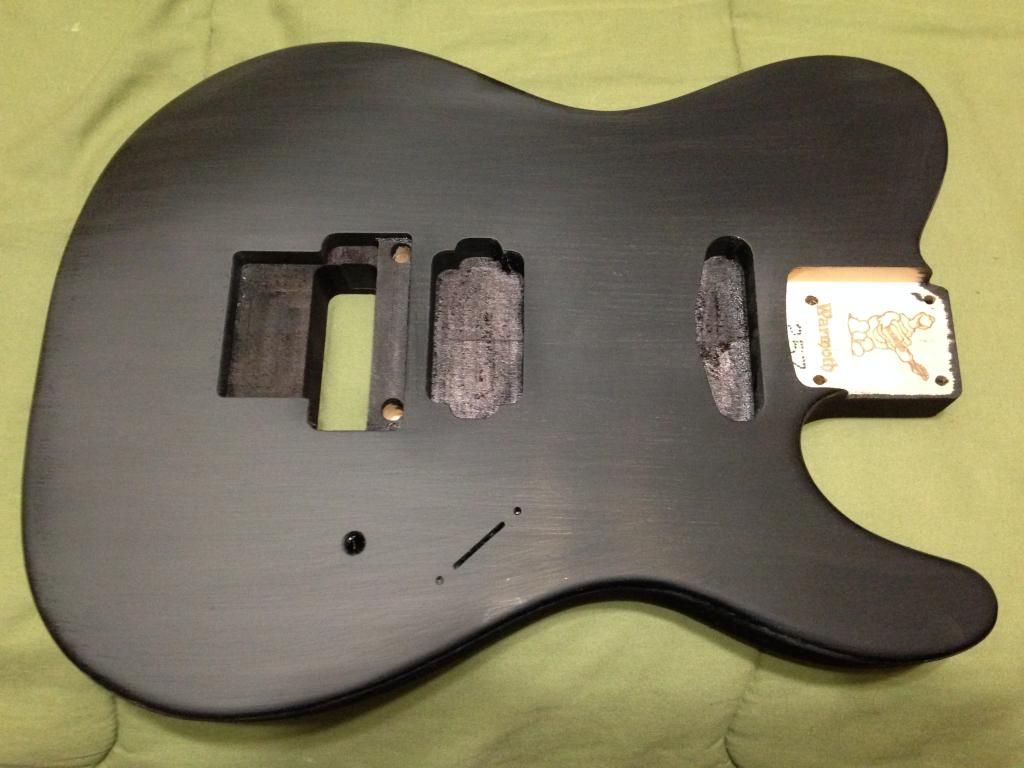
I got this shade just by slapping two coats of that fiebing's ebony leather dye stuff (this is basswood)
I dig it
I dig it


Whatnow2012 wrote:try humberck piskup is bettor for metal than singlecpoil for blues
Unstrung wrote:ya it am bast
Rampage wrote:When life hands you distortion, fuck everything else.
_________________
Rigs:
Bauer-Burny-Dark Matter-Hamer-Ibanez-Starfield-Warwick
Fryette PowerStation, Peavey 5150 2x12, Peavey VTM60, Starfield VPA-1, Sound City Master Lead 50, VVT Simo-Plex, Taurus THD450
Re: Staining a headshell
Devin wrote:I got this shade just by slapping two coats of that fiebing's ebony leather dye stuff (this is basswood)
I dig it
Nice! Looks rad. How are you finishing it?
_____________________________________________________
I have some gear and junk...
Like Coffee? Like Pedals and amps? Like General Jackassery???
Check out "Dunky's N' Demos at:
https://dunkysndemos.com
https://www.youtube.com/c/JeremyVarao
I have some gear and junk...
Like Coffee? Like Pedals and amps? Like General Jackassery???
Check out "Dunky's N' Demos at:
https://dunkysndemos.com
https://www.youtube.com/c/JeremyVarao
Re: Staining a headshell
I put Tru-Oil on top of that (kinda got a lil too frisky at certain parts and got some drips, but whateva) and then gunstock wax on top of that. It has a real smooth but raw feel/look.
I'll post a NGD thread soon; I'm just about done with it
I'll post a NGD thread soon; I'm just about done with it
Whatnow2012 wrote:try humberck piskup is bettor for metal than singlecpoil for blues
Unstrung wrote:ya it am bast
Rampage wrote:When life hands you distortion, fuck everything else.
_________________
Rigs:
Bauer-Burny-Dark Matter-Hamer-Ibanez-Starfield-Warwick
Fryette PowerStation, Peavey 5150 2x12, Peavey VTM60, Starfield VPA-1, Sound City Master Lead 50, VVT Simo-Plex, Taurus THD450
Re: Staining a headshell
Devin wrote:I put Tru-Oil on top of that (kinda got a lil too frisky at certain parts and got some drips, but whateva) and then gunstock wax on top of that. It has a real smooth but raw feel/look.
I'll post a NGD thread soon; I'm just about done with it
Kick ass! 1 hum and 1 Single is my preferred pickup config. Can;t wait to see it finished!
I also have a new found appreciation for bolt on guitars.
_____________________________________________________
I have some gear and junk...
Like Coffee? Like Pedals and amps? Like General Jackassery???
Check out "Dunky's N' Demos at:
https://dunkysndemos.com
https://www.youtube.com/c/JeremyVarao
I have some gear and junk...
Like Coffee? Like Pedals and amps? Like General Jackassery???
Check out "Dunky's N' Demos at:
https://dunkysndemos.com
https://www.youtube.com/c/JeremyVarao