ZERO experience with finishing wood. Watched some vids and it doesn't seem all that complicated (no offense). I am getting an all pine headshell and it is raw wood. I know I need to sand it first. The builder said to also use a pre-treatment (recommended MinWax) to help stain absorb evenly.
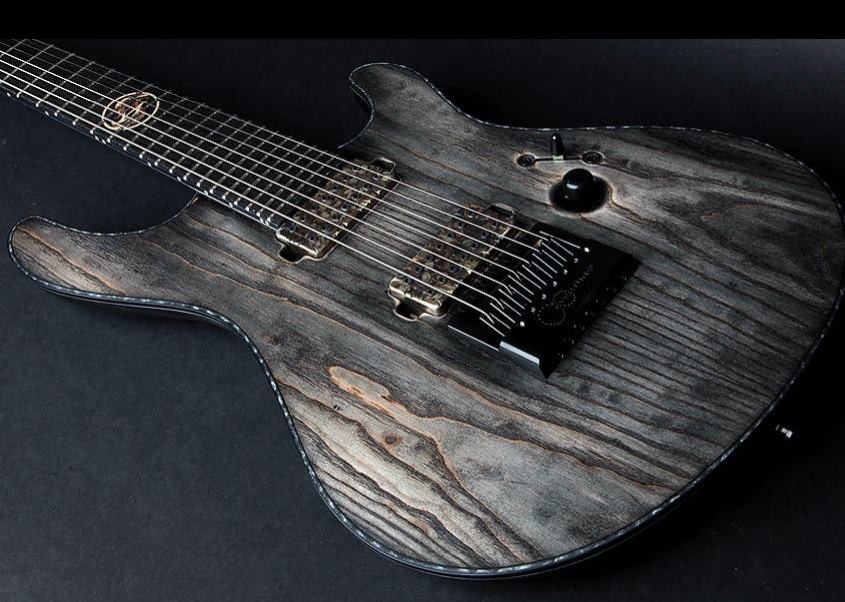
I want to do something like this:
It's actually kind of uneven anyway. more charcoal with perhaps a green tint to play off the power switch.
Just not sure what kind of stain I would use. Gel based? Water or oil based? Also, looks like, based on a vid I saw for doing a peruse finish on pine that the grain filler goes on AFTER the stain? is that right?
I have a gecko stand I built and stained that's extremely similar to that, just birch instead of, what is that, ash?
Water based pre-treatment, and Minwax ebony off-the-shelf water based stain. I did the pre-treatment, let it sit overnight, sanded. Repeated, letting it sit through the day. Sanded again. Tack cloth, rubbed in the ebony stain with a cloth (wear gloves). Let it dry for 24 hours, sanded it. Tack cloth, repeat the whole process until you're happy with the way it looks. In the end I went over it with a satin poly after it had sat for another day to dry out thoroughly.
I'm sure there's a million other ways to get that sort of result, but that's what worked for me. My desks in my office are similar except I went over with a final blast of ebony to make them really black and then used gloss poly really heavy to give them a strong working surface. YMMV.
There are lots of ways to go about it and you're right, it's not all that complicated. Just gotta respect the prep work.
One challenge I had was in using a palm orbital sander. Not a good idea if you're gonna stain. It puts all kinds of tiny, barely visable swirly marks in the wood that only really show up as soon as you put stain on it, and boy do they show up big time. Best method I've found for sanding is a good old fashioned hand held sanding block. I fought against the idea because I didn't want to have to put out all the energy, but it's the truest path to a nice, clean finish.
And I use Minwax Pre-Stain Conditioner. Just wipe it on, wipe off the excess, and then apply stain within 20 minutes to an hour. It really does help. But if you decide to go with a gel stain, I don't think it requires any pre-stain at all. At least the gel stain that I recently used did not.
You'll have plenty of stain and treatment if you're only doing the headshell, so use some of it to practice on some scrap wood. Try stuff out. Experiment a little. Get a feel for how it behaves.
It isnt complicated, but there are skills and knowledge that you wont be able to grasp understand for quite awhile.. BUt you should be able to pull of something decent..
Ive been finishing wood professionally basically my entire adult life.. From spraying custom cabinets, to trim, doors,stairs, railings, floors, etc. etc.. basically if its wood in a house, Ive finished or refinished it for the last 18+ years.. Plus, all the guitars Ive built..
Anyway, I dont feel like writing a book, plus there is plenty of shit online you can peruse which can get you in the right direction.
A couple things. Dont skimp on the sanding. I see a lot of sanding mistakes that are totally preventable. If you are doing it by hand, then sand up to 220, but no higher. The finer you sand it, the less the stain will take. Will get blotchy on pine.. Honestly I dont even sand to 220 except for guitars before stain.. Everything else I usually go 150-180. Thats plenty fine and is easier to get a more uniform finish... Floors for example we final sand with 100 grit.. But thats a high powered sander.
IF you have a random orbital sander(which Id recommend for your project) I'd prolly go as high as only 150 grit..
As far as stain, the pre-conditioner pretty much sucks in my opinion and never use it. It basically prevents the stain from absorbing and for the color you are going for it might take a few applications of stain if you used the pre-conditioner.. Whenever we need to "condition" the wood to take stain we use water.. Which is referred to as popping the grain.. Basically do all your sanding and then after thats done wipe it down with water.. Now the wood will get rough at this point.. Which is where some finishing experience comes into play, because by the end of this process we still get the finish to be glass smooth, but a novice may have difficulty with that.. So you can pop the grain twice. Meaning after you wipe down the wood with water the first time.. Let it dry and then resand it again to your final grit.. Then wet it a 2nd time.. This will cut down on grain raise.. It'll still have some fiber "hairs" raised but it should be quite a bit less.. Then go ahead and use your stain.. Wipe on and wipe right off.. You can use Oil or a water base stain for a headshell, but I always use oil.. You do not want a gel stain. Let dry over night
You dont do anything to the stain(unless you are doing some "aging" or other relicing). Apply you r first coat of finish on top of the stain. (You wont need any grain filler for pine). Let dry and lightly buff by hand with 180-220 grit.. Dont go thru into the stain.. You dont want to get too nutty on sanding the finish until you get some finish built up.. Do that for the next 2 coats.. At this point you can sand more aggressively to smooth out the finish. If yo uare doing it by hand stay with 180, or 150 if you need some extra cut. Then try to get a smooth final coat.. Depending on how durable you want this to be, 4 coats of a good water or oil base finish should be sufficient for a headshell.. But if the final coat isnt up to par, or isnt smooth enough, jsut keep doing another round of sanding the finish smooth and applying a final coat..
nOw, If you have a random orbital sander, use 220 grit to get final smoothness before the final coat.. You should have no issue gettin the finish to be glass smooth using a random orbital with 220 grit after 3 coats of finish has been put down..
Last edited by EndTime on Mon Mar 14, 2016 8:23 pm, edited 2 times in total.
mortatone wrote:There are lots of ways to go about it and you're right, it's not all that complicated. Just gotta respect the prep work.
One challenge I had was in using a palm orbital sander. Not a good idea if you're gonna stain. It puts all kinds of tiny, barely visable swirly marks in the wood that only really show up as soon as you put stain on it, and boy do they show up big time. .
Only true if you dont operate the sander proper, or you put those scratches in with a heavier grit and you didnt sand them out with the final grits.. The "chatter" marks are user error.. Sorry.. But they are certainly preventable..
BTW, sanding a headshell by hand isnt that big of a deal either.. Depending on the piece or my mood of the day I still hand sand plenty of things.. BUt it should go without saying you want to sand WITH the grain.. Cross scratches are quite unsightly and will ruin the look more than sander marks.. YOu can use the best of both worlds and use a RANDOM orbital sander ( they also sell just orbital sanders but those are not as forgiving) for 90% of the work, and then final sand by hand to make sure you didnt leave any sander marks behind.. To avoid any chatters witth a random orbital, just be sure the paper is in good shape.. Keep it relatively clean from debris.. JUst a tiny particulate caught in the paper will add chatters or worse. So either have a vacuum nearby with a brush attachment cleaning your work(and sandpaper) as you go, or just dry wipe it clean after each grit..
Also do not push down on the sander at all.. Let the sander do all the work and always keep it in constant motion, albeit rather slowly. Do not be moving it back and forth across the whole piece quickly .. Go slowly from side to side, keep it flat and very light pressure on the sander.. Nice and relaxed essentially. Dont lift it and angle the sander to take out stubborn marks cause that will also put in MORe marks.. A good random orbital palm sander (like a Dewalt for $60) will get a you a near perfect surface if used correct..
EndTime wrote:BTW, sanding a headshell by hand isnt that big of a deal either.. Depending on the piece or my mood of the day I still hand sand plenty of things.. BUt it should go without saying you want to sand WITH the grain.. Cross scratches are quite unsightly and will ruin the look more than sander marks.. YOu can use the best of both worlds and use a RANDOM orbital sander ( they also sell just orbital sanders but those are not as forgiving) for 90% of the work, and then final sand by hand to make sure you didnt leave any sander marks behind.. To avoid any chatters witth a random orbital, just be sure the paper is in good shape.. Keep it relatively clean from debris.. JUst a tiny particulate caught in the paper will add chatters or worse. So either have a vacuum nearby with a brush attachment cleaning your work(and sandpaper) as you go, or just dry wipe it clean after each grit..
Also do not push down on the sander at all.. Let the sander do all the work and always keep it in constant motion, albeit rather slowly. Do not be moving it back and forth across the whole piece.. Go slowly from side to side, keep it flat and very light pressure on the sander.. Nice and relaxed essentially. Dont lift it and angle the sander to take out stubborn marks cause that will also put in MORe marks.. A good random orbital palm sander (like a Dewalt for $60) will get a you a near perfect surface if used correct..
Good luck!
I'd love to be able to use the orbital more often, but everything I've tried still leaves the swirleys. Go down to a finer grit and still I just get finer swirleys. I'll take what you've mentioned and diligently attempt it again and I hope I get it. But I always ended up just busting out the sanding block to get it right.
A sheet sander, like what you have, are certainly a lot more susceptible to sanding marks.. I guess I should have specified a 5inch disc random orbital sander http://www.mscdirect.com/product/details/39236559
The prices on that site are pretty exaggerated tho.. You should be able to find that same disc sander for $60 or so..
The sheet sanders are definitely tougher because any deviation in how you put the paper on could cause it to sand unevenly and leave marks. Plus just poking the holes in the paper so you can get some dust collection leaves portions of the paper sitting higher, or simply left a spot in the paper that is just out of whack enough that it'll leave marks. Or for instance when securing the paper on the sander and just having one edge of the paper not being held tight and has a little "play" will likely cause issues.. I agree for a stained project, I would prolly hand sand the final grit to take out any sander marks with a sheet sander....
Its almost certainly a dye rather than a stain. I didn't want to come right out and say you will not get close with a minwax stain but i know its easily available.
If you are to attempt it anyway with Minwax ebony, I'd go ahead and use the minwax preconditioner, since that prevents stain from penetrating too deep and absorbing too quick. You then will see why this stuff isn't as easy as it looks.
But if you really want to try your best, then you need to look into dyes you mix yourself. And that is only a black dye fairly diluted to achieve that look.
Btw, if you use the minwax stain, and pop the grain with water like i mentioned earlier it allows the stain too penetrate quicker and deeper. It'll no.doubt be much darker than your picture(but we arent comparing apples to apples here), and in my opinion it'll be a better look than using the pre stain conditioner. I guess experiment on some scraps to see the difference and what u prefer
Hey man, I am certainly not looking to discredit anyone's profession by trade when I say it doesn't seem that hard to do. I am the kind of person that is easily intimidated by any type of hand skill, mechanical fuckery.
I always assume I'm just going to fuck something up hence the thread looking for some pointers. I may not try and get too creative on this and just stain it even with a color if some test pieces come out abysmal.
The couple hours of vids I watched made is seem more doable than I imagined.
Your pic isnt showing up.. But you can pretty much use anything and get results.. It just takes different techniques and skillset for whatever you choose.. But IMO using a stain is a bit more difficult to control the depth of the color for a gray tone like that.. Ebony stain has a lot of pigment in it.. Perhaps buy 2 quarts of ebony and mix one quart up like normal to get the proper stain mix(because there will be plent of pigment that setttles to the bottom of the can) and on the other quart dont mix all the sediment on the bottom of the can.. Maybe it gives you the right tone of grey/black.. Either way, you are going to want to try some scrap pieces first because trying to get greys and blacks to come out like you want takes some practice.. I did a recent build not long ago on Alder that sorta emulates that color. Because Alder has a slight brown tone, I had to bleach the wood first before I could obtain this color. This was an alcohol dye I mixed myself..
EndTime wrote:Your pic isnt showing up.. But you can pretty much use anything and get results.. It just takes different techniques and skillset for whatever you choose.. But IMO using a stain is a bit more difficult to control the depth of the color for a gray tone like that.. Ebony stain has a lot of pigment in it.. Perhaps buy 2 quarts of ebony and mix one quart up like normal to get the proper stain mix(because there will be plent of pigment that setttles to the bottom of the can) and on the other quart dont mix all the sediment on the bottom of the can.. Maybe it gives you the right tone of grey/black.. Either way, you are going to want to try some scrap pieces first because trying to get greys and blacks to come out like you want takes some practice.. I did a recent build not long ago on Alder that sorta emulates that color. Because Alder has a slight brown tone, I had to bleach the wood first before I could obtain this color. This was an alcohol dye I mixed myself..
That looks awesome.
Just watched this on stain cs dye.
I think I definitely want dye. I'll have to mess with dilutions and see what works best.
It's probably pretty close to the truth to say that doing a simple stain/finish job is pretty straight forward and perhaps even easy. The hard part and the art is in being able to target a specific result and successfully achieving it.
Most of the staining I've done so far has been purely experimental, knowing that if it came out meh that I would be sanding and redoing. Luckily I haven't had to do too much of that.
Do you have a woodcraft in your area? Or anywhere besides lowes or Home Depot to get supplies?
mortatone wrote:It's probably pretty close to the truth to say that doing a simple stain/finish job is pretty straight forward and perhaps even easy. The hard part and the art is in being able to target a specific result and successfully achieving it.
Most of the staining I've done so far has been purely experimental, knowing that if it came out meh that I would be sanding and redoing. Luckily I haven't had to do too much of that.
Do you have a woodcraft in your area? Or anywhere besides lowes or Home Depot to get supplies?
Not sure to be honest. After watching the first vid above, I may order the dye set from Keda. They send 5 colors so I can mix some and test out on some boards. Billy made a good pint and for the test run I will probably just take the tole off the current headshell, sand it down and dye that to try the process. Shit, that might look good enough to not warrant buying another headshell.
Holy-diver wrote:what grits should i buy, im planning on using an oil based stain and i was thinking down to like 200, but whats a good progression?
Depending on how much sanding is necessary. If yo ucan start at 120, then start there. Do 120, 180 and maybe 220 if you want.. But 180, or even 150 should be fine as a final grit if it was sanded by hand.. Any smoother than 220 and you are essentially polishing the wood which is closing the grain more and more and prevents stain from penetrating and absorbing evenly.. Especially maple.. For guitars I generally sand maple to 220 and it works well.. But again, thats using dyes.. For typical Minwax oil stains, its not necessary to sand it glass smooth before you stain.. Like I mentioned its closing the grain and for a wood like maple to take stain evenly(which it really doesnt) you ideally want the grain to be open.. Which is either sanding up to 150, or "popping the grain" if you wanted to go real dark like Ebony..